But first, why should you care about input lag? If you are a gamer or a vision scientist, it can matter quite a bit. In the old days of CRTs there was no delay at all - the instant your video card sent a pixel to the display it appeared, with ZERO lag, with at most 1ms for the pixel to reach full brightness. With modern LCDs (and even OLED) displays it takes a while for the monitor to start drawing each pixel received - between 2ms and 100ms depending on the model and settings - this is called input lag. In addition to input lag there is response time - how long it takes for the pixel to reach the final brightness - this can vary between 2 and 25ms. This is the spec published for most monitors, but as you can see it is only half the story. On the newest displays input lag and response time often contribute equally so it's important to measure both.
For an action gamer playing with high input lag means always responding late. If your display has 50ms of lag, everything that happens in game (such as a new enemy appearing) only shows up 50ms later. It also makes aiming in FPS much harder if you target is moving - sure it was in your sights 50ms ago, but where is it now? Or for run and jump gamers it means trying to jump off the edge of a platform and instead falling off it.
Many displays for sale today don't have published input lag numbers, and even for those that do the resolution and settings of the display can make a significant difference in what values you get (for instance, deinterlacing 480i content can be shockingly slow). Being able to test your personal display, with your personal settings, is the best way to ensure you have low input lag. Also, reducing input lag can sometimes increase response time so being able to measure both is important to make sure you are actually getting an improved gaming experience rather that just chasing specs.
Introducing the piLagTesterPro
Our input lag and response time tool is an affordable ($100), full featured add-on to the Raspberry Pi; we provide the sensor and a fully configured SD card with the software + OS ready to go. You provide the Pi (a $5 pi Zero is more than sufficient for most uses). Although it has a DIY aesthetic, it is quite functional and offers quite a lot more features than the alternatives (Leo Bodnar and the Time Sleuth).
Here's what it looks like in action:
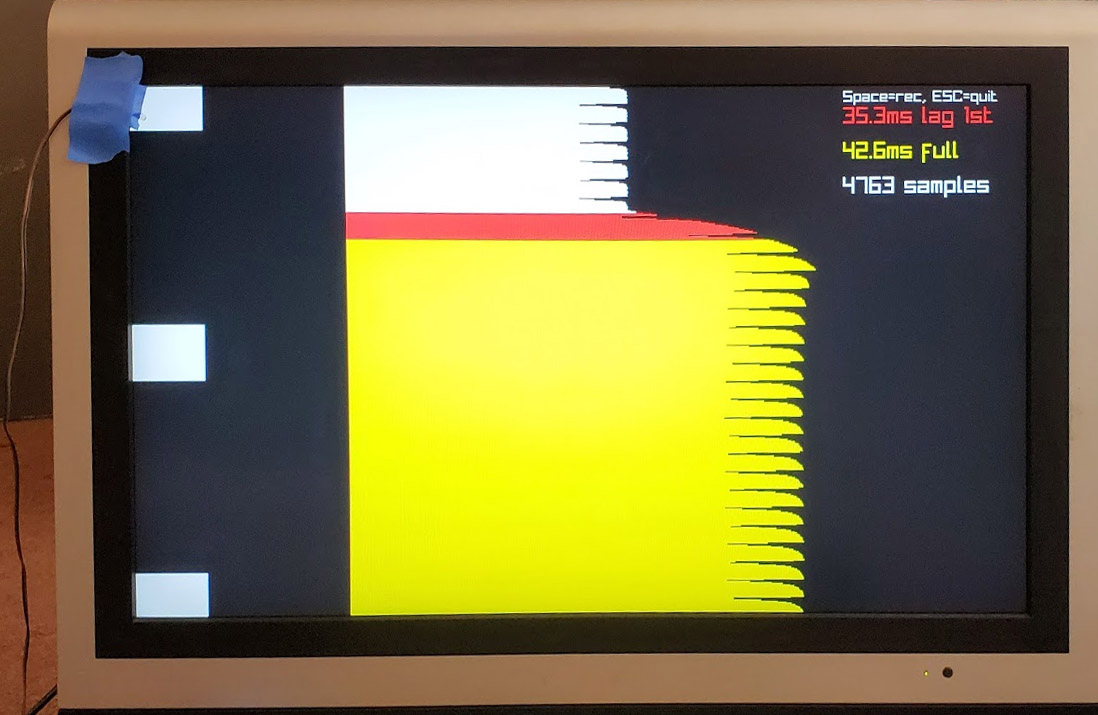
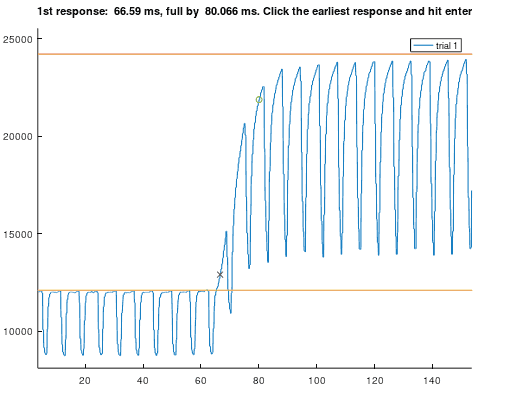
This was generated using Octave on a desktop PC (Octave is free and runs on PC/MAC/Linux). if you are happy with the defaults no programming is required to produce the this figure using the example code provided. If you desire custom plotting it's also possible to export the raw data to CSV format which can easily be important into any spreadsheet or plotting program.
To keep costs low the hardware is built with the minimum amount of glitz:
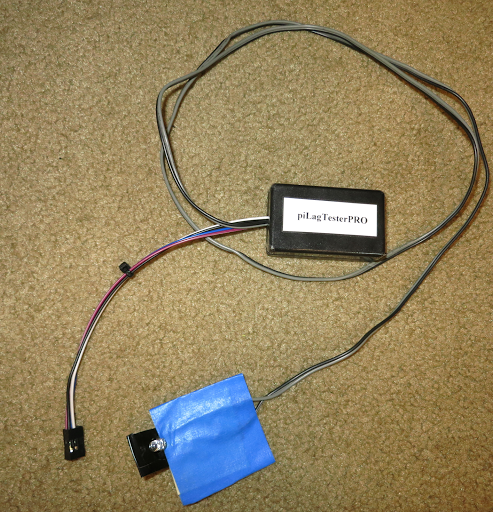
We provide everything you need the except the Pi. You just plug the ribbon cable into the GPIO header on your Pi and position the light sensor on your TV. The light sensor is attached to the blue rectangle of tape. Let's get a close up of the sensor in action:

Because it is just a photodiode on a wire, it's very light (is that a pun?), which means it can easily be held in place with tape at the edge of the screen. This is much more handy than the TimeSleuth or Leo Bodnar because you can leave our sensor attached while you fuss with settings on your monitor/deinterlacer/whatever and find out what combination produces the least input lag or response time. In my experience a single piece of 3M blue tape will last about 30-50 applications before it starts to fail if you carefully keep it clean.
The lag testing software runs on Linux but we provide an entire bootable disk image so no configuration or installation is required. For that reason very little understanding of Linux is required; you just need a few single-word commands that are printed out each time you power up your PI. Or if you have more advanced needs, the full power of Linux can be applied to the lag tester, making it possible to automate many aspects of measuring input lag for different resolutions and refresh rates.
The piLagTesterPRO replies on the Raspberry Pi to generate all the video signals. Thus, with a pi4 ($25+), it's possible to test all the way up to 4096x2160x60hz. Even higher refresh rates can be tested at lower resolutions. Or if you are on a budget you can also use the same lag testing hardware with a Pi0, which costs only $5, but maxes out at 1080p/1200p at 60hz (higher refresh rates are possible at lower resolutions).
Here's a short video of the piLagTesterPRO testing a 1080p TV at several different resolutions and refresh rates, and a similar video measuring input lag with a 4k TV.
Ordering the piLagTesterPRO
Want to buy the piLagTesterPRO? Click below to order online:Pi LagTester PRO order form
 hcidesign.com